Deploying Terraform at scale with GitHub Actions
Using a pull-request workflow

I used to be a .NET developer. Nowaways, I am a DevOps solutions architect with a focus on Azure and Kubernetes.
I also love productivity topics, especially when it comes to doing more with less of my time. I'm also a daddy, so time is a limited resource for me.
Have you wondered what is the best workflow to use open-source Terraform at scale? In this blog post, I'll walk you through my favorite workflow using GitHub Actions. I'll deploy to Azure, but the same workflow can be adapted with other cloud providers.
TLDR; I wrote a Terraform composite action that you can just plug into your GitHub workflow to make this happen. Jump ahead to Putting it all together section.
Background
Here's the thing with GitHub - it favors automation running from pull requests and issues. For example, with other systems, Azure DevOps and GitLab, engineers can create "stages" to be able to separate environments and promotion through environments. And while GitHub has "environments" and "stages," I don't find them as effective as the other competing platforms. Even if it did, I like the pull-request workflow because it addresses some of the challenges I experienced at scale.
At scale, I ran into the following challenges:
- Accountability - For companies not interested in paying for Terraform Cloud, having other engineers consistently review the Terraform plans can be difficult. Making engineers go to a pipeline log to view the Terraform plan reduces the experience and increases the chance that someone will blindly approve without looking closely at the plan.
- Really large Terraform plans - While very much discouraged, sometimes they happen. Big bang Terraform deployments are sometimes unavoidable on the first promotion to an environment.
Note: This content was inspired by the README of the setup-terraform action and experiences in the real world.
What guide is not
- A beginner guide on Terraform
- An introduction to how to create GitHub Workflows/Actions
- A how-to on creating a simple pipeline that deploys to Azure
The process
This process uses a trunk-based branching strategy. Environments like "dev", "test", and "prod" are isolated via folders and there's a single long-lived branch, main.
.
├── production
│   └── main.tf
└── staging
    └── main.tf
Why folders? I find it the most elegant, and it's a whole topic. It also works well with a pull-request workflow. If you wonder about the advantages of separating different environments via folders vs. branches vs. workspaces, then Yevgeniy Brikman recently wrote an in-depth blog post series on this topic.
So, here's what the process would look like.
- When someone opens a pull request, a GitHub workflow will kick off and run
terraform plan. - When someone merges the pull request against
main, the same GitHub workflow will kick off and run bothterraform planandterraform apply. - Depending on what files under which environment folder were changed, a different GitHub workflow will trigger. For instance, if someone changes the Terraform code inside the
stagingenvironment folder, it will trigger the staging GitHub workflow for the staging environment.
Note: Terragrunt will help you keep code DRY, but it's certainly not a requirement to use Terragrunt for environmental folders.
Writing the GitHub Actions
1. The trigger
When someone changes a Terraform file in the environment folder, trigger the appropriate action. You'll need a GitHub workflow file per environment.
# .github/workflows/staging.yaml
name: 'Terraform - Staging'

on:
  push:
    branches:
    - main
    paths:
    - staging/**
  pull_request:
    branches:
    - main
    paths:
    - staging/**
2. Create a GitHub environment
Under the settings of the repository you're using, create an environment like "Staging." Then, if you're deploying to Azure, you can create an Azure Service Principal and set secrets like CLIENT_ID and CLIENT_SECRET for the new environment. By having secrets scoped to the environment, you can use separate service principals per environment.
If you are not deploying to Azure, you can create whatever secrets your Terraform provider needs to authenticate.

3. Set the permissions for GITHUB_TOKEN
The following sets the permissions for the GITHUB_TOKEN to be able to add comments to the pull requests. You have to add this to your GitHub workflow file, which can be at the same level as on and jobs. The good news is that this configuration avoids you having to create a GitHub PAT.
# .github/workflows/staging.yaml
permissions:
  contents: read
  pull-requests: write
4. Set-up Terraform Action
GitHub-hosted runners don't have Terraform installed out of the box, and you'll want to install it on each workflow run. Even if you use self-hosted runners, you still might want to consider using this action so that each repository can fully control what version of Terraform they are using.
Also, in the following snippet, we're using the "Staging" environment we created.
# .github/workflows/staging.yaml
jobs:
  terraform:
    runs-on: ubuntu-latest
    name: Terraform
    environment: staging
    steps:
    - name: Setup Terraform
      uses: hashicorp/setup-terraform@v2
      with:
        terraform_version: 1.1.9
        terraform_wrapper: false
Note: terraform_wrapper is set to false. This flag means there won't be a wrapper that highjacks the STDOUT from the Terraform commands. We'll still get fancy to add the Terraform plan to the pull-request comments.
5. Terraform Init
This step requires that you have a Terraform backend configured. Otherwise, your pipeline won't work correctly since you will dispose of the Terraform state on each run. Here's how to set up a Terraform backend using Azure.
# .github/workflows/staging.yaml
- name: Terraform Init
  id: init
  run: terraform init
  env:
    ARM_CLIENT_ID: ${{ secrets.CLIENT_ID }} # This doesn't have to be a secret. Client IDs are not sensitive.
    ARM_CLIENT_SECRET: ${{ secrets.CLIENT_SECRET }}
    ARM_SUBSCRIPTION_ID: "[Your Subscription ID]"
    ARM_TENANT_ID: "[Your Tenant ID]"
  working-directory: ./staging # Use your environment folder
  shell: bash
6. Terraform Plan
We're getting closer to the good part. There are some important arguments that we provide to Terraform when we "plan":
-input=false- This flag tells Terraform to fail if there are some missing variable values that were not specified. Otherwise, Terraform will stop the pipeline because it will ask the user (that's not there) for a variable value.-no-color- This flag tells Terraform not to be cute and show colors. Otherwise, you'll see funky characters in the output stream of the GitHub actions.-out tf.plan- This tells Terraform to write the plan to a local file. It will be used by theterraform applyandterraform show.
# .github/workflows/staging.yaml
- name: Terraform Plan
  id: plan
  run: |
    terraform plan -input=false -no-color -out tf.plan
  env:
    ARM_CLIENT_ID: ${{ secrets.CLIENT_ID }}
    ARM_CLIENT_SECRET: ${{ secrets.CLIENT_SECRET }}
    ARM_SUBSCRIPTION_ID: "[Your Subscription ID]"
    ARM_TENANT_ID: "[Your Tenant ID]"
  working-directory: ./staging # Use your environment folder
  shell: bash
7. Terraform Show
The show command simply replays the information shown from terraform plan. During this action, we will pipe the output of terraform show to a local temporary file.
# .github/workflows/staging.yaml
- name: Terraform Show
  id: show
  run: terraform show -no-color tf.plan 2>&1 > /tmp/plan.txt
  working-directory: ./staging # Use your environment folder
  env:
    ARM_CLIENT_ID: ${{ secrets.CLIENT_ID }}
    ARM_CLIENT_SECRET: ${{ secrets.CLIENT_SECRET }}
    ARM_SUBSCRIPTION_ID: "[Your Subscription ID]"
    ARM_TENANT_ID: "[Your Tenant ID]"
  shell: bash
8. Write the plan to the pull-request
In this step, we use actions/github-script@v6 to create the GitHub pull-request comment. The action runs open-ended scripts that you create in JavaScript. The contents of the pull-request comment come from the temp file created in the earlier step.
# .github/workflows/staging.yaml
- uses: actions/github-script@v6
  if: github.event_name == 'pull_request'
  with:
    github-token: ${{ inputs.GITHUB_TOKEN }}
    script: |
      const fs = require("fs");
      const plan = fs.readFileSync("/tmp/plan.txt", "utf8");
      const maxGitHubBodyCharacters = 65536;

      function chunkSubstr(str, size) {
        const numChunks = Math.ceil(str.length / size)
        const chunks = new Array(numChunks)
        for (let i = 0, o = 0; i < numChunks; ++i, o += size) {
          chunks[i] = str.substr(o, size)
        }
        return chunks
      }

      // Split the Terraform plan into chunks if it's too big and can't fit into the GitHub Action
      var plans = chunkSubstr(plan, maxGitHubBodyCharacters);
      for (let i = 0; i < plans.length; i++) {
        const output = `### ${{ inputs.plan-title }} Part # ${i + 1}
        #### Terraform Format and Style 🖌\`${{ steps.fmt.outcome }}\`
        #### Terraform Initialization ⚙️\`${{ steps.init.outcome }}\`
        #### Terraform Plan 📖\`${{ steps.plan.outcome }}\`
        <details><summary>Show Plan</summary>
        \`\`\`\n
        ${plans[i]}
        \`\`\`
        </details>
        *Pusher: @${{ github.actor }}, Action: \`${{ github.event_name }}\`, Working Directory: \`${{ inputs.working-directory }}\`, Workflow: \`${{ github.workflow }}\`*`;

        await github.rest.issues.createComment({
          issue_number: context.issue.number,
          owner: context.repo.owner,
          repo: context.repo.repo,
          body: output
        })
      }
Lastly, if you look closely, there are some magic variables like maxGitHubBodyCharacters and a helper function chunkSubstr. These are my learnings from working with Terraform, specially really large plans. There is a known discussion that reveals that there is a limit to how big a comment can be, and it's tied to the underlying GitHub comment schema in their database. So, the maxGitHubBodyCharacters is the limit of characters allowed by GitHub's database, and chunkSubstr function breaks any huge comments into smaller parts.
Here's what the actual pull-request comment would look like.
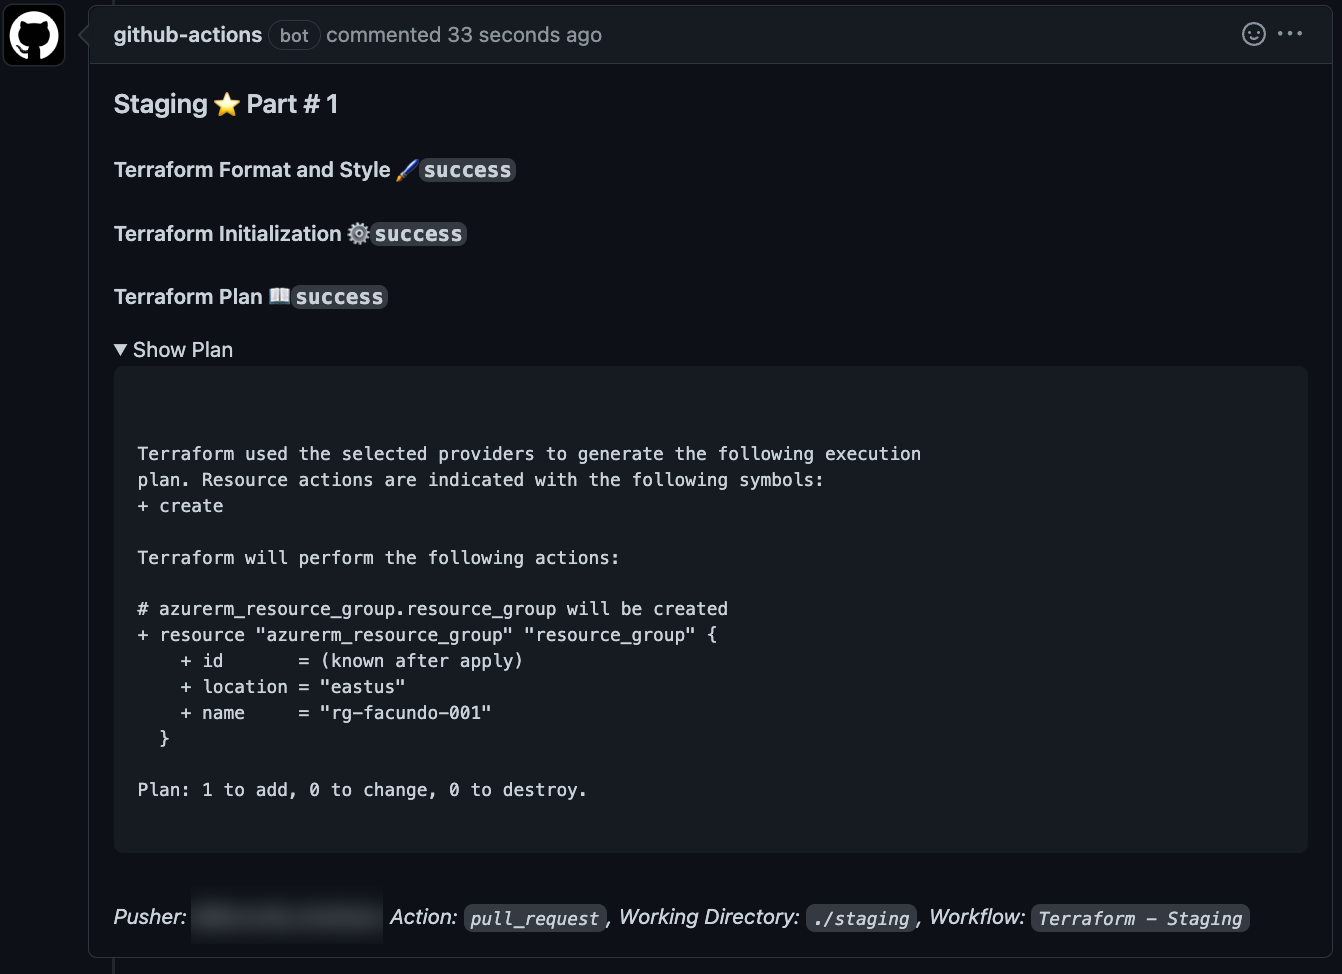
The line of code that says <details><summary>Show Plan</summary> is the toggle "Show Plan" in the pull-request comment.
9. Terraform Apply
In this step, we will "apply" the plan file created during terraform plan. Notice there is a conditional if operator, so the apply only happens when the GitHub workflow runs from the main branch. If you use a different branch name like master, you would have to adjust this GitHub action.
# .github/workflows/staging.yaml
- name: Terraform Apply
  if: github.ref == 'refs/heads/main' && github.event_name == 'push'
  run: terraform apply -input=false tf.plan
  env:
    ARM_CLIENT_ID: ${{ secrets.CLIENT_ID }}
    ARM_CLIENT_SECRET: ${{ secrets.CLIENT_SECRET }}
    ARM_SUBSCRIPTION_ID: "[Your Subscription ID]"
    ARM_TENANT_ID: "[Your Tenant ID]"
  working-directory: ./staging # Use your environment folder
  shell: bash
Putting it all together
Combining all these actions for each repository and environment can be overwhelming. So, I created a GitHub composite workflow that you can reuse. If you cannot use it because of organizational policies, you can copy the action source code.

And, here's how you would use it.
# .github/workflows/staging.yaml
name: 'Terraform - Staging'

on:
  push:
    branches:
    - main
    paths:
    - staging/**
  pull_request:
    branches:
    - main
    paths:
    - staging/**

permissions:
  contents: read
  pull-requests: write

jobs:
  terraform:
    runs-on: ubuntu-latest
    name: Terraform
    environment: staging
    steps:
      - uses: actions/checkout@v3
      - uses: boxboat/[email protected]
        with:
          client-id: '<< service principal client id >>'
          client-secret: ${{ secrets.CLIENT_SECRET }}
          default-subscription-id: '<< some subscription id >>'
          tenant-id: '<< some aad tenant id >>'
          working-directory: './staging'
          plan-title: 'Staging :star:'
          GITHUB_TOKEN: ${{ secrets.GITHUB_TOKEN }}
          terraform-version: 1.1.9
That's it! 🎉
The Caveats
Here are the caveats that you should be aware of.
- Race conditions - There won't be anything preventing you from trying to deploy conflicting changes simultaneously. Let's say you have two pull requests against the same environment, then merge them one after the other. The GitHub actions will trigger twice at roughly the same time. In the best-case scenario, one of the pipelines fails to acquire the terraform lock on the backend provider. You'll have to be diligent about which pull request and the other in which you merge them.
- Large plans - As mentioned earlier in this post, large Terraform plans are never fun to work with. There is a limit on the size of the GitHub comment you can write to issues and pull requests. Therefore, to have a reliable workflow, your GitHub action should account for large Terraform plans and try to break up the plan into multiple comments. An alternative to the solution covered in this post is to trim the
terraform planwhen it gets past a specific size. - Noise in pull-requests - While performing with a big bang deployment, we had to update pull-request multiple times. So, because each plan created about 20 comments, there was a lot of noise. A co-worker didn't like this, so he deleted old and irrelevant comments before each Git push. If you prefer to update the comment, check out the README for the setup-terraform action.
Conclusion
I love Terraform. Some of my coworkers call it "terrorform" because of the quirky challenges at scale. If companies don't pay for a solution like Terraform Cloud, adopt Atlantis, or use other paid solutions, they will have to engineer solutions like the ones discussed in this post. Hopefully, you found this helpful. Feel free to leave a comment below if you have questions. You can also tweet me at @gaunacode.