Create a VM with a deployment group agent using Terraform

I used to be a .NET developer. Nowaways, I am a DevOps solutions architect with a focus on Azure and Kubernetes.
I also love productivity topics, especially when it comes to doing more with less of my time. I'm also a daddy, so time is a limited resource for me.
One of the advantages of PaaS to IaaS is how easy they are to deploy to. If you have to use IaaS, you’d still want to use Infrastructure as Code and CI/CD pipelines.
In this guide, I will show how to provision a VM on Azure with the Azure DevOps deployment group agent pre-installed. When the VM comes up, it will also register against an Azure DevOps deployment group.
Background
Deployment groups allow you to deploy to on-prem servers or IaaS workloads on any cloud. It’s a group of machines that have Azure DevOps agents installed on them and they communicate outbound with Azure DevOps. You can define a release to a deployment group that will run a set of tasks. For example, you can deploy to IIS, copy files to the machine, deploy Windows Services, and other things.
Set-Up
Creating the Deployment Group
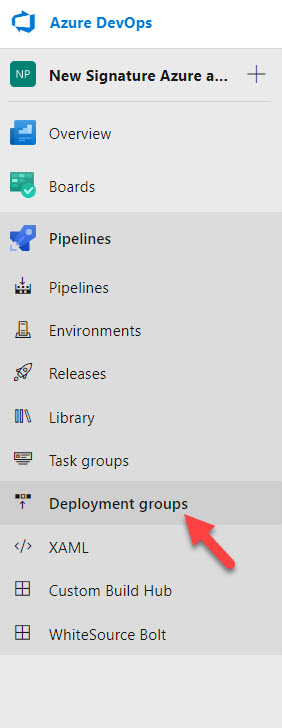
First, define a deployment group to deploy to. Pick an Azure DevOps Team Project, and go Pipelines. From pipelines, select Deployment Groups.
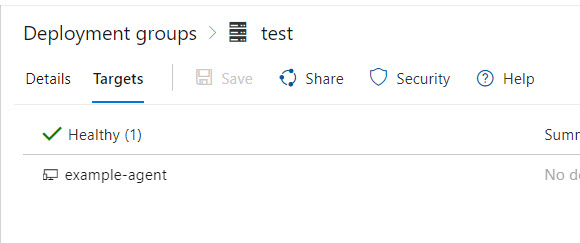
Create a new deployment group. I called mine test.
Creating a new PAT
Next, you’ll need a Personal Access Token (PAT).

Next, create the new token. Choose the expiration date that works for your and give it a descriptive name. Once you create it, you won't be able to retrieve the value. So, make sure you copy it or don’t close the browser tab until you finish this guide.

Terraform
Here’s some quick configuration on provisioning a simple Windows Server VM. I called my file vm.tf.
resource "azurerm_virtual_network" "virtual_network" {
  name                = var.vnet_name
  address_space       = ["10.0.0.0/16"]
  location            = var.location
  resource_group_name = azurerm_resource_group.resource_group.name
}

resource "azurerm_subnet" "main_subnet" {
  name                 = "subnet1"
  resource_group_name  = azurerm_resource_group.resource_group.name
  virtual_network_name = azurerm_virtual_network.virtual_network.name
  address_prefix       = "10.0.2.0/24"
}

resource "azurerm_network_interface" "nic" {
  name                = "nsg-${var.vnet_name}"
  location            = var.location
  resource_group_name = azurerm_resource_group.resource_group.name

  ip_configuration {
    name                          = "internal"
    subnet_id                     = azurerm_subnet.main_subnet.id
    private_ip_address_allocation = "Dynamic"
  }
}

resource "azurerm_windows_virtual_machine" "vm" {
  name                = var.vm_name
  resource_group_name = azurerm_resource_group.resource_group.name
  location            = var.location
  size                = "Standard_F2"
  admin_username      = var.vm_admin_username
  admin_password      = var.vm_admin_password
  network_interface_ids = [
    azurerm_network_interface.nic.id,
  ]

  os_disk {
    caching              = "ReadWrite"
    storage_account_type = "Standard_LRS"
  }

  source_image_reference {
    publisher = "MicrosoftWindowsServer"
    offer     = "WindowsServer"
    sku       = "2016-Datacenter"
    version   = "latest"
  }
}
Here’s the variables you’ll need to define.
variable "vm_name" {
  type = string
}

variable "vnet_name" {
  type = string
}

variable "location" {
  type = string
}

variable "vm_admin_username" {
  type = string
}

variable "vm_admin_password" {
  type = string
}

variable "azure_devops_organization" {
  type = string
}

variable "azure_devops_teamproject" {
  type = string
}

variable "azure_devops_deploymentgroup" {
  type = string
}

variable "azure_devops_agentname" {
  type = string
}

variable "azure_devops_pat" {
  type = string
}
Deployment Group Agent
In order to install the deployment group agent to this VM, we must use the Azure DevOps deployment group VM extension.
resource "azurerm_virtual_machine_extension" "vm_extension" {
  name                 = "deploymentgroup_agent"
  virtual_machine_id   = azurerm_windows_virtual_machine.vm.id
  publisher            = "Microsoft.VisualStudio.Services"
  type                 = "TeamServicesAgent"
  type_handler_version = "1.0"
  auto_upgrade_minor_version = true

  settings = <<SETTINGS
    {
        "VSTSAccountName": "${ var.azure_devops_organization }",
        "TeamProject": "${ var.azure_devops_teamproject }",
        "DeploymentGroup": "${ var.azure_devops_deploymentgroup }",
        "AgentName": "${ var.azure_devops_agentname }"
    }
SETTINGS

  protected_settings = <<PROTECTED_SETTINGS
    {
      "PATToken": "${ var.azure_devops_pat }"
    }
PROTECTED_SETTINGS
}
The settings are parameters that the VM extension needs in order to register to the proper deployment group. The protected_settings are more sensitive settings, like the PAT.
Here’s what they should be:
VSTSAccountName(azure_devops_organization) - The name of your Azure DevOps organization. For example, if you usehttps://dev.azure.com/mycompany, then the name of your org ismycompany.TeamProject(azure_devops_teamproject) - The Azure DevOps team project you’ll be using to release from.DeploymentGroup(azure_devops_deploymentgroup) - The deployment group agent you created above in “Set-Up”.AgentName(azure_devops_agentname) - The name of the agent. It could be useful to name this after the vm.
That’s it! Once you terraform plan and apply you’ll have a new VM that has registered to Azure DevOps. Give it several minutes.